Monday, March 31, 2014

Agnieszka juz tutaj wiecej nie mieszka

... which means roughly:

Agnas doesn't live here anymore


Anyway, fun song that was stuck in my head while I was removing the engine.

Crane won't reach from the front.  I was getting ready to remove the bumper then thought it may be worth a check from the side.

That was the ticket.  


The tranny is 16.5 inches high.  I only had 12 inches of clearance under the car so I decided to drag it out through the top using 2 straps to control the angle.  This was not a good move.  I didn't manage to keep the pan under the end the whole way so I lost about a cup of tranny fluid on the driveway.  I think the right move would have been to use the crane to lift the car by the frame rails.  Then slide the tranny out.  I was surprised how light it is.  It's barely heavier than the Lotus transaxle but handles more than 3 times the torque.  Probably because the Lotus trans also has the differential in it.

Golly, I think I am almost done (JK).

I am surprised how much room Agnas had in there.


Sunday, March 30, 2014

rain -> cleanup

It has been pouring the last two days so I can't get out to the Mustang.  Forced inside I changed the leaking couplings on my hard air lines.  I had these on there:
Which I advise against.  They seemed reasonable at the time; This type works on hot water heaters, and natural gas.  They either stink for compressed air or are really sensitive to a little misalignment.
I put on compression fittings today:
No more leaks!  I shut the valve to the tank and the line held pressure for the rest of the afternoon.  Still pouring outside, so I moved more house tools to the basement and organized tools and parts.  Still could do more, but much better than it was.  I did the always regrettable rearranging the tool box drawers.  So much for ever finding anything again. 


Friday, March 28, 2014

engine lift bracket

It was raining today so I couldn't get out an grapple with more stuck choss.  I have been thinking about how I am going to get the Mustang engine out.  I have always run a few slings around the engine and lifted gingerly.  Everything I read says you will smash the sump that way, but I never have.  I also have never lifted an engine this heavy.  I have seen that people lift by the intake manifold bolts so I thought I would give it a try.  I welded up a little fixture tonight to use:


Thursday, March 27, 2014

mustang exhaust off

Exhaust came off today.  I broke off a couple galled up wheel studs, but otherwise the whole process is reversible.  The bolts at the header coupling were almost impossible to get.  They were accessible through cutouts in the fender, but when one was stuck I had to take the spring out to get leverage on it.  I had to compress the spring a bit to get it out.  When I did springs on my last mustang, I was able to get the new one onto the perch but not this time.

I will probably have to get this banded if I want it back in.  It will have to go in if I ever want the mustang on its wheels again.  The spring rests on a perch rather than a coil over like in the Focus.  I will do some measuring tomorrow.  If that perch fits in the focus wheel well, and if mustang track width ~ Focus track width, I may just swap the whole subframe over.


Wednesday, March 26, 2014

molded plastics

A couple years ago I left the world of making composites the proper way with thermosetting resins and continuous fibers, and took a job designing parts with short fiber composites with PEEK thermoplastic resin.  Traditional composites tend to be shell type shapes that are large and flat. These short fiber thermoplastic composite processes flow both the resin and the fiber together into complicated shapes.  I have enjoyed that the parts do more complicated jobs, and that there is a lot more design freedom.

My friend Mike Dotsey has always had a real knack for designing things that are clever, and look aesthetically good.  I asked him about that years ago, and he said that he thinks the key is to take apart as much stuff as you can to see how other people do things.  I took that to heart and have always tried to notice how things are made, and try to guess at or understand how they work.  I even take apart my kids' toys if there is some mechanism in it that I can't guess at (I reassemble them.  Don't picture me hack sawing the head off their favorite robot while they stand by crying)

On this project working with more modern cars, I have been able to see lots of structural molded plastic parts similar to what I design with at work.  It has given me some ideas on how to approach some things.  I didn't see anything earth shattering that I never thought of, but here are a few neat parts:


This is a piece that ties the fenders to the bumper, holds the hood shut, and supports cables, wires and the lights.  Notice all the egg crate structure underneath.  This will be there to help with the overall dimensional stability, but can help buckling performance.  I think it is interesting that these are on a 45° bias instead of parallel and perpendicular with the edges.  This is probably to add torsional stiffness to an otherwise open section.  We are forced to design with mostly open sections because of molding limitations and this is an interesting approach to get back some of what is lost.


(same part) Notice the metal insert on the end of this is bolted on, not molded in.  The whole metal insert is bent up from one piece of metal.  You can see the large flange on the bolt to avoid high compressive stress in the plastic from the bolt.  It seems odd to me that they didn't just mold these features in to save assembly and part count.  Maybe flexible metal attachement with large clearance holes is this is how they deal with molding springback, or the fenders flexing.

On the right notice the fingers that hold the hood latch cable.  I think that is a clever way to do that.  Of course if the customer says, "If the cable comes loose then people die," you would use and adel clamp never look back.


Alright, This one is fairly earth shattering to me.  This is a duct that takes air from under the dash, traipses through the console then blows it out in the foot well of the rear seats.  There is no way to withdraw a tool from the inside of this, so it is molded in two pieces then somehow fused together.  I expect using rf welding, ultrasonic welding or the like.  What is interesting is that the inside is smooth with no sharp seam or flash.  I don't exactly know what they did.  If you do, let me know!


This is a bracket that holds the center arm rest.  Nothing too fancy here.  Pretty much what I expect.  The ribs are not very elegant in this.  They are really deep and I think some of them are there just to suppress buckling in their neighbors.  I think the deep ribs are like this to make this thing stiff for bending on the minor axis.  If that is the case, I would have made at least one that is a straight shot bottom to top.  I like the inserts that seem to be popped in after molding.  Sort of like the wall hanger you would put in drywall.


Notice the rubber isolation mounts on this which seem to be really low profile.  People tend to really cram on shifters so I am surprised that this is a plastic part, and that it is as dainty as it is.  


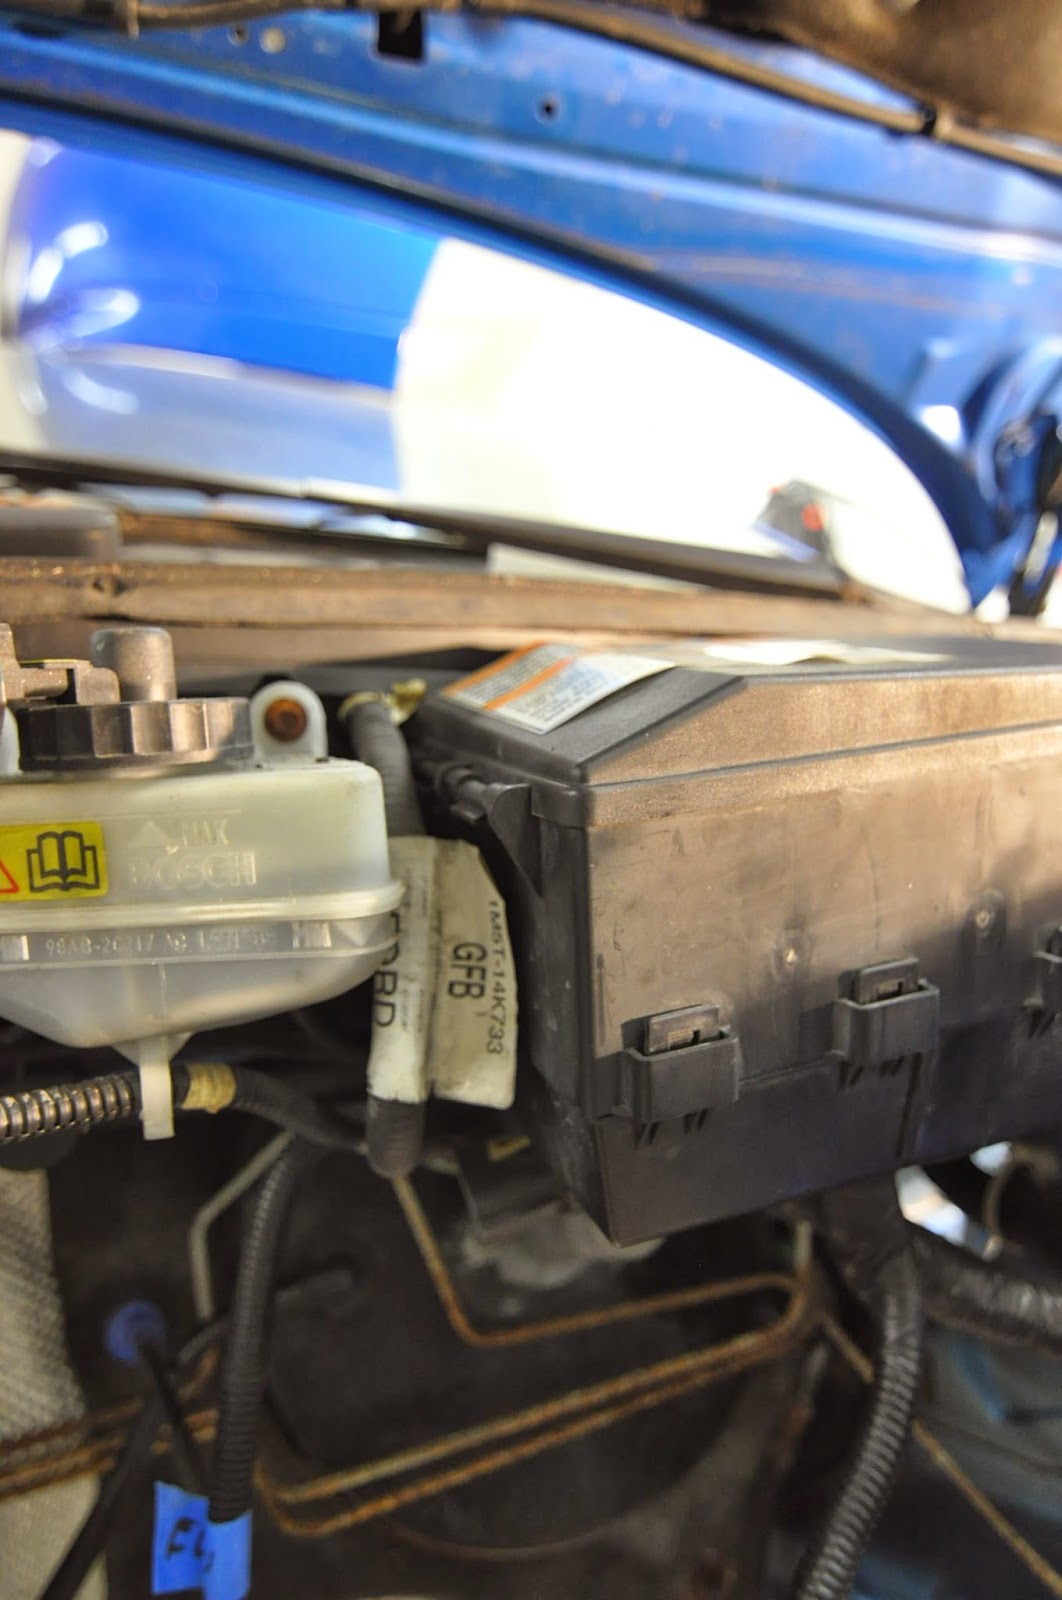
 This is the fuse box.  In the left image I like the snap hook on this for the latch.  Notice how they give a nice handle to lift on with your finger, and that they molded in stops to prevent us from busting the thing off by pulling it too far.  In the picture on the right you can see the molded hinge uses a snap hook to retain the hinge bolt.  I think this is very well done.


Tuesday, March 25, 2014

ruining the 2nd car that almost works

So I went "live" last night and told everyone about the blog.  Thanks for everyone's supportive comments.  It was motivating enough to send me out today in the cold to make progress.  I started preparing the mustang to take the engine out.  I removed hoses, undid all the wiring and labeled it, took off the accessory belt and the alternator.  Shot some liquid wrench on a few things, and put the car up on stands.


It was too cold to start crawling around under there and getting into the real business.  It just started snowing again.
I still had to disconnect the last two AC lines on the Focus.   I tried making the tool out of some card stock and also tried sweeping a small screw driver around the little spring.  Nothing would make it let go.  I went to HF last night after we went to dinner and I got the plastic AC quick disconnect tool.  My daughter was so funny there.  She was marching around the store with Marta saying, "I'm carrying these tools for my daddy" as she would add or leave behind additional tools that caught her fancy.  Also noteworthy that this was the first time we have had both kids out to eat and neither of them flipped out.  I am still on a high from that.  It is so nice to not cause a scene.  Just last week I carried Olivia out of a frozen yogurt shop in a manner that surely triggered an Amber alert.

Anyway, the plastic AC tools work great where the metal ones did not work at all. Unbelievable how easy it is to disassemble those with the right tool, and how impossible it is without them.  Those connections are a clever little contraption.  If you have not yet had the pleasure. Maybe you can tell from this picture.  There is a little spring necklace inside the lip on the rusty female piece (you can just see it in the image.  The male piece has a flare.  The spring expands during insertion, but not during withdrawal.

Monday, March 24, 2014

preparing the new home

So the Focus continues to shed parts.  I am trying to make some deliberate decisions as I remove some systems.

Will I keep air conditioning?
It would be nice to have, but it seems like such a pain for now.  I think I will lose it but try to do it in a way that I can add this later if I want.  I need to get the quick disconnect tool to disassemble this any further.  I borrowed the Harbor freight one from a neighbor.  The sizes are off a little.  Not sure if that is a ford thing, or HF thing.  The reviews suggest it is a Ford thing and the plastic ones will work better.  I'll have to see if I can get over there some time soon.

Will I keep power steering?
I looked at the Kugel website and they use a mustang rack in their build.  I have a mustang rack. What's even better is that I have a power steering pump on the engine, so keeping power steering may be a no brainer.  I also have the mustang control arms and hub carriers.  I will have to see how much of that stuff lines up.  I want to avoid an epic investigation into suspension and steering geometry.  Actually it isn't the investigation I want to avoid as much as the mistakes that will come from my ignorance.

What electrical systems do I need?
EFI and electronic ignition are gone.  So the PCM can go too.  But not so fast!  The radio is keyed into the computer to prevent theft (The radio's ugliness and odd size are apparently not enough) so if I want to keep the radio, I may need the PCM.  If I keep that, is keeping the airbags an option?  I don't know yet.  I found the pin out for the PCM.  Most likely I will do nothing with this info for now to avoid taking the whole dash apart until I have to.


I did a lot of clean up in the engine bay.  Here is where we are now:

I still have air conditioning nonsense, and big pieces of wiring harness hanging in the wheel well.  I could also cut away some bracketry that I don't need, but for now I am ready to turn my attention to the Mustang when I get a weather window.  Also, here is the front subframe from the Focus:

I removed the shifter from inside and the heat shielding under the car to make room for the new shifter.  I will have to cut a hole.  Notice the silver module under the E-brake lever.  This is the sensor for the airbags.  Makes a lot of sense it would be here instead of somewhere near the front of the car like I expected.  Here it sees the same accelerations as the seats.  Also, it won't see thermal shocks, and since you don't go poking around your center console often, you are unlikely to whack it fooling with something else.

I had a friend who missed a shift road racing and blew an engine. He was trying to figure out a good way to prevent hooking the wrong gear.  I always thought the reverse lock out is clever on Fords where you have to lift a collar to get into reverse gear.  The collar lifts on a spring and allows a little mass of plastic lower down to clear a gate.  Probably could use this concept with a lever or some other way.  Here is what it looks like:


Sunday, March 23, 2014

Focus -4

While playing around with the earlier posts of this blog, I have been chopping my focus.  It is always a weird feeling to undo stuff that was put together all those years ago at the factory.  I remember how psyched I was when I picked this car up with my dad 12 years ago before graduate school.  Lately I've been thinking of all the trips its taken, and people who have ridden in it.  I hope I don't blow this and it will share some more fun times with me.  Anyway:


In that last picture you get a pretty good view of the engine.  I have not seen pictures around of a FWD engine and transmission separated from a car.  There is a lot of stuff crammed in there, and I learned a bit as I went through this:

  1. A front engine front wheel drive configuration is a pretty crumby thing to do space wise.  Just look at that ridiculous header.  Not surprising that a v8 can swap into this same space.
  2. Ball joints suck to separate.  No insight here, I did each of them differently.  The most stubborn one like this (not possible with the axle in)
  3. I was amazed how smoothly the shift cables operate.
  4. There is a lot more stuff in there than in my Lotus.  I mean I knew there would be but holy smoke.  I wonder if I could put it all back together again.  I like to think I could, you know, minus the exhaust pipe I sawzalled, and the power steering line I chopped.
  5. I have always heard it is very hard to get the driver's side axle out of the case on a Focus.  You can see it hanging there in the last picture.  Once out of the car, I thought I'd have a go at it.  I took a long crow bar in there and gave it a couple crisp smacks and out it popped out.  Not a BFD.  In the car however, without 3 feet of influence it would have been very hard I expect.
  6. Impact sockets kick so much butt.  I finally bought some and they work so much better than regular sockets, especially not needing a 1/2 to 3/8 adapter anymore.  I strongly recommend the deep ones from HF.  Cheap, and nothing wrong with them.
  7. That said, breaker bar is still > Impact gun for large stuck bolts
  8. Disposable Nitrile gloves will stop you from having dirty ass redneck hands that won't come clean. Valuable if by day you have to wear a button down shirt and speak in a hushed voice.
  9. Get one of these at a swap meet.  I don't know what it is called, but I got it for like $2 and it takes off all those plastic clips that push in but don't come out.  It also will help separate a lot of electrical connectors that are hard to reach.  It paid for itself just in connectors it saved, let alone the hours saved, and not burying a screw driver into my hand repeatedly.
  10. Your radiator is filthy.  I can not believe how much grit dumped out of the outside of it.  Go blow yours out now.  Oh, yeah the inside is filthy too.  I was surprised how much rust and crud was in my coolant.